Welcome to Handy Harp II
Introduction
Thank you very much for purchasing Handy Harp II. This manual covers all the basic operations and functions of the application, so we encourage you to read it thoroughly before use. Please note that this manual does not explain the basic structure of the harp. For detailed information on the structure of the harp, please refer to the web or specialized books.
The contents of this manual are subject to change without notice by Procyon Studio Co., Ltd. and we assume no responsibility whatsoever for the information contained herein.
Additionally, no part of this manual may be recorded, reproduced, translated or reprinted for any purpose or in any form without the written consent of Procyon Studio Co., Ltd.
All product and company names mentioned in this manual are trademarks or registered trademarks of their respective owners.
© 2013-2025 PROCYON STUDIO CO., LTD.
© 2025 KIRA Ryouta
All Rights Reserved.
Regarding Chords Registered in This Application
The chords registered in this application are selected based on their common usage. Regarding tension chords, chords up to 9th are currently registered, however additional chords may be added in future updates.
Regarding the Naming of Chords
Handy Harp II is an application sold worldwide, consequently, internationally standardized notation is used in the chord names. Root notes are denoted by uppercase letters, minor by a lowercase "m", major by an uppercase "M", augmented fifth by "aug", diminished fifth by "(♭5)" and diminished by "dim". All tensions are indicated in parenthesis.
Regarding Enharmonic Notation
Within the application, scale and code name notation uniformly uses flat (♭) notation for all enharmonic equivalents of root notes. This is to reflect that the harp is fundamentally a flat-based instrument and to enhance notation consistency and readability.
Presenter Introduction
Tomoyuki Asakawa
Tomoyuki Asakawa graduated from the Music High School attached to the Faculty of Music, Tokyo University of the Arts and graduated from the same university's Composition Department and Specialized Organ Program. He has composed and arranged music for numerous films, TV drama, commercials and other projects. He has received the Japan Academy Prize for Outstanding Music twice, the Asia-Pacific Film Festival Best Music Award, the Victor Hit Award and other honors.
Official Website: https://www.ifif77.com
Facebook: https://www.facebook.com/harp47/
Programmer Introduction
KIRA Ryouta
KIRA Ryouta has released numerous music applications for iPhone and iPad. His notable works include "Piano Modoki", "KQ Dixie" and "KQ Sampei", among many other applications.
Regarding "KQ Sampei"
The synthesizer part of Handy Harp II uses the "KQ Sampei Engine" developed by KIRA Ryouta. This engine enables beautiful, high-quality performances on iPhone and iPad.
Official Website: https://www.kiraqtech.jp/
Play Screen
Play Area
-
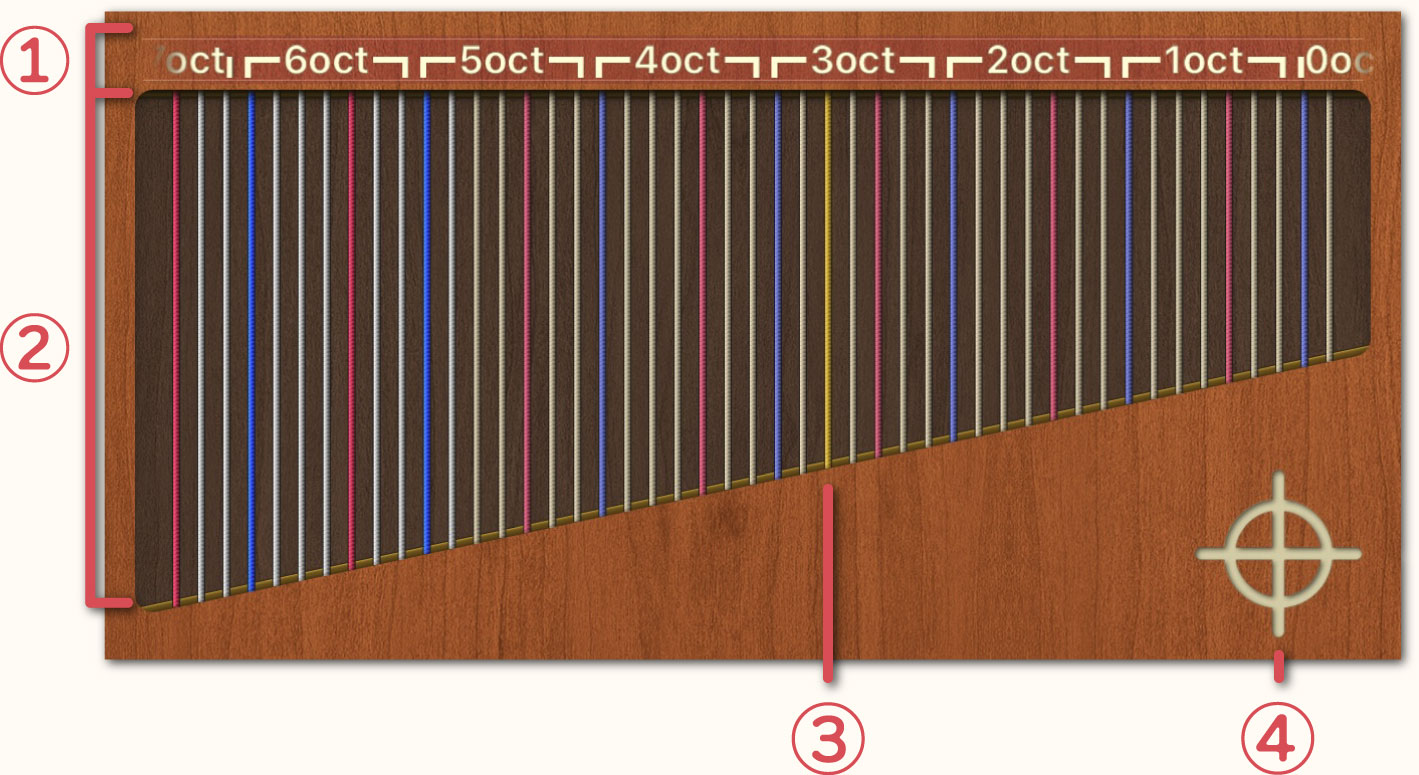
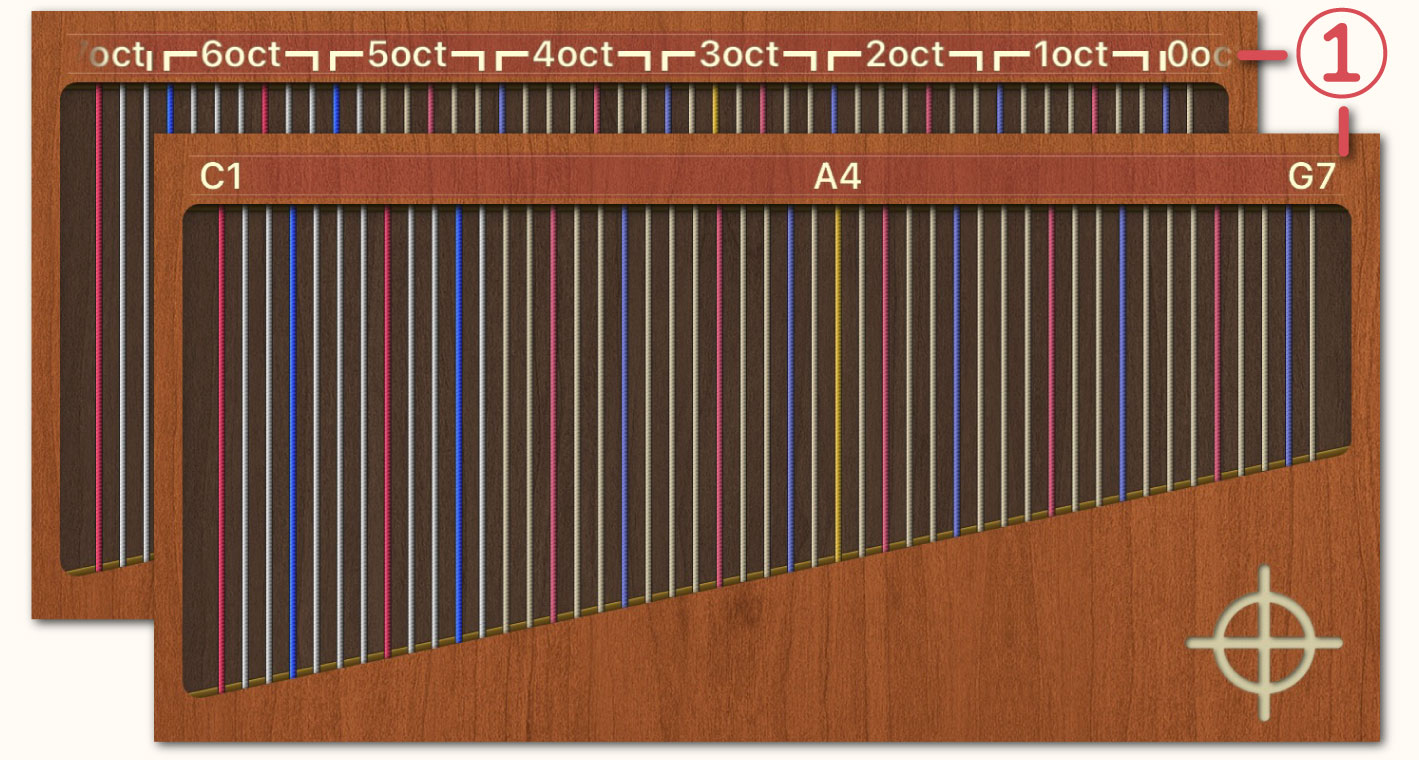
 You can choose between two ruler styles: "Harp" and "Standard". On the Settings Screen, you can change the style by toggling the [Note Style] setting. The style shown above is the "Harp" style.
-
 The harp can be played by tapping on or sliding across the Play Area.
Red String: Do
Blue String: Fa
Yellow String: Center (A4)
-
 On the Settings Screen, setting the [A4 String] option to "Normal" will change the color of the Yellow String to a normal color.
-
 Tapping the étouffé (mute) button will stop the reverberation of the strings.
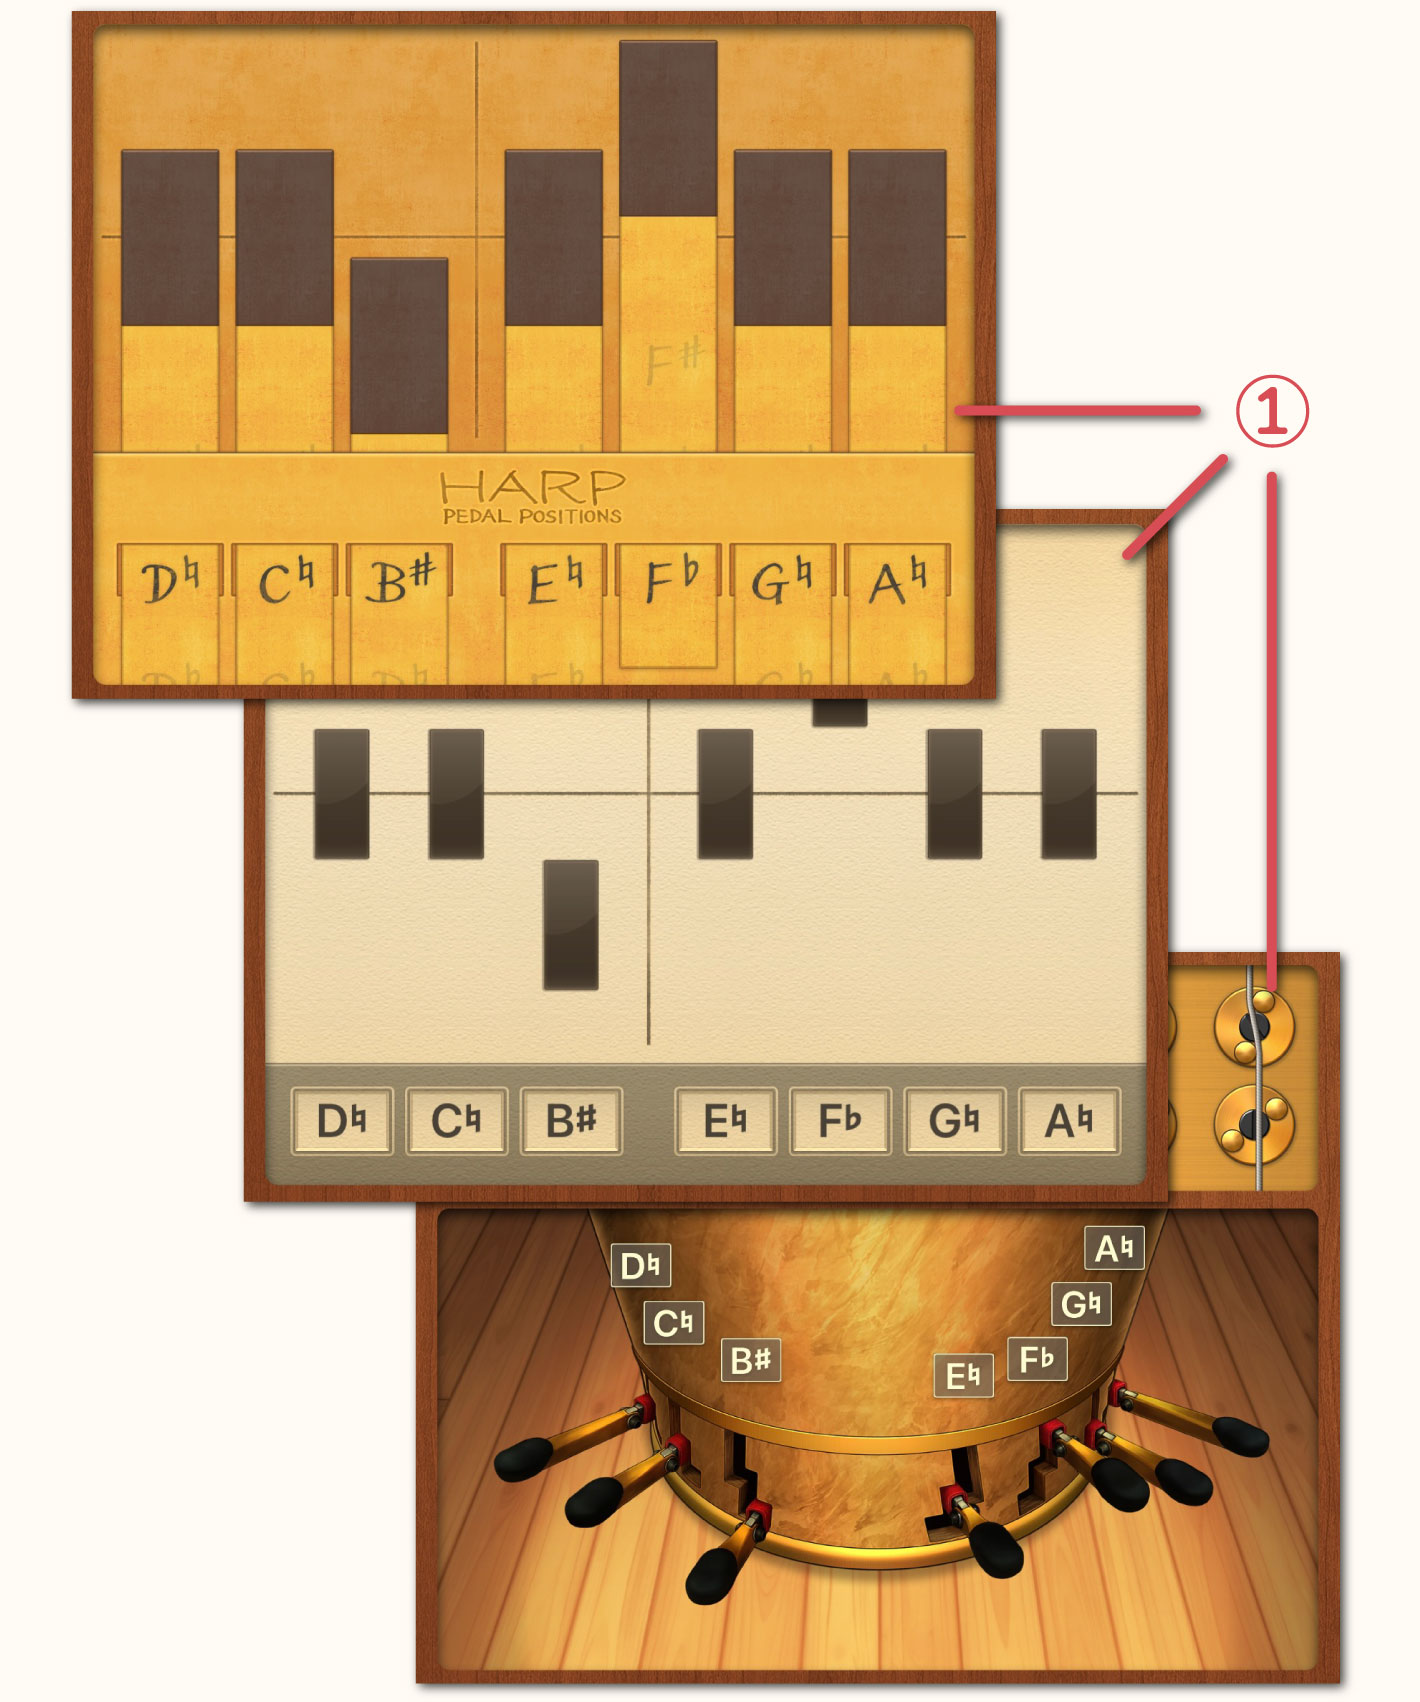
Pedal Area
-
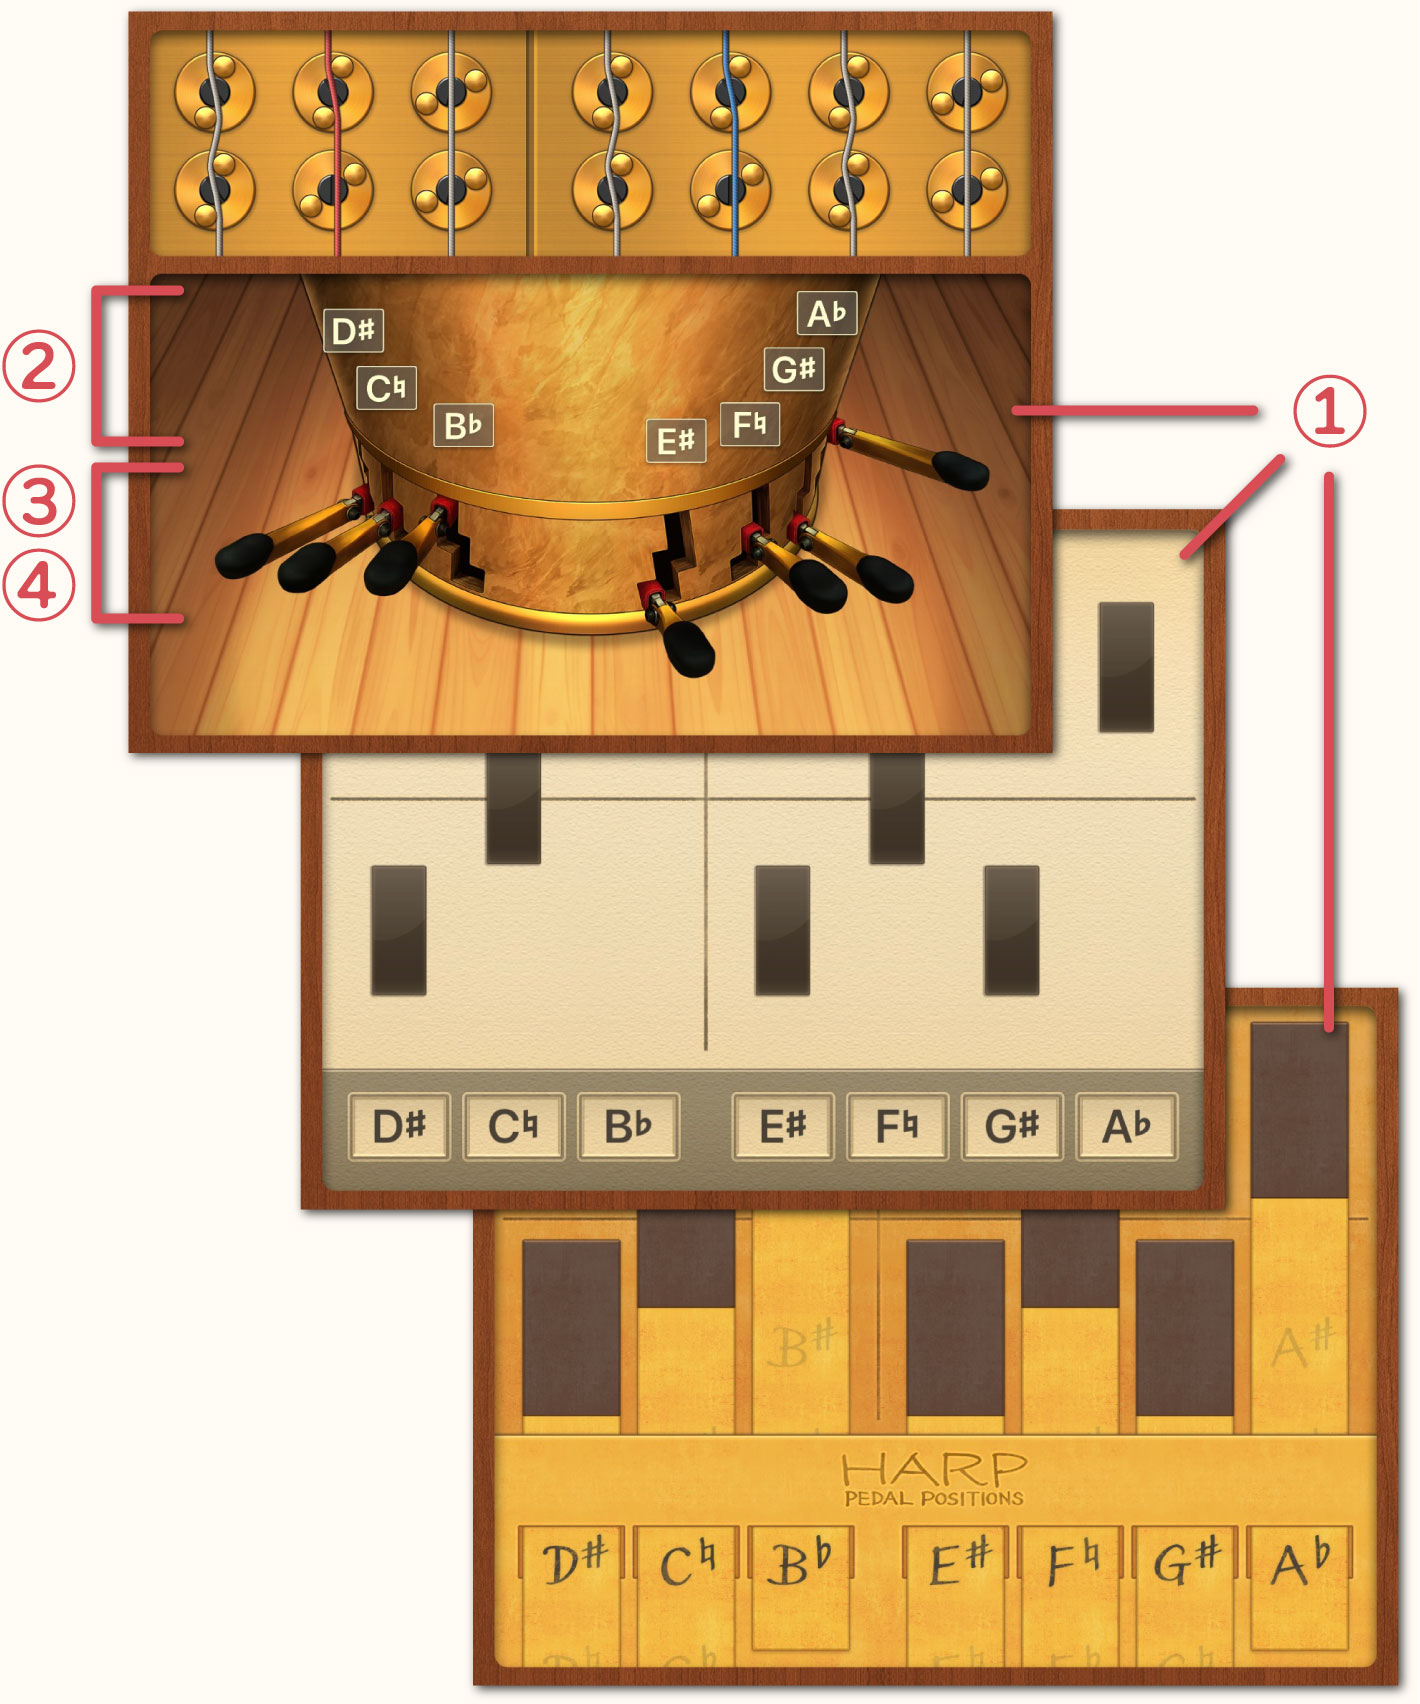
The Pedal Design can be selected from three types: "Real", "Diagram and "Paper". The type can be changed by changing the "Pedal Design" setting on the Settings Screen.
-
The harp has seven pedals, each corresponding to the notes from Do to Si. The note names of each pedal are displayed here.
-
Using touch controls, the pedals can be moved to the upper, middle or lower positions.
-
By tapping, holding and moving your finger, it is possible to move multiple pedals simultaneously. Additionally, tapping, holding and then returning your finger to its original position will automatically return the pedals to their original positions.
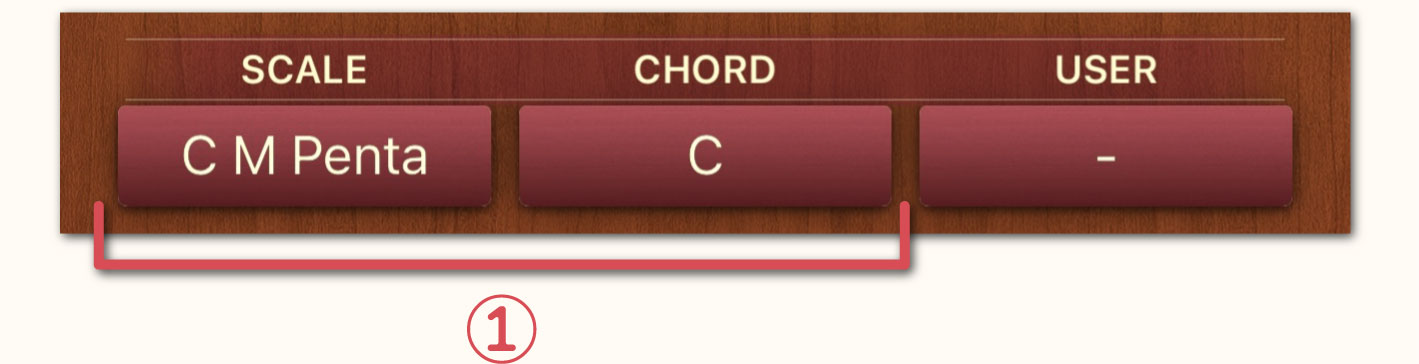
Scale, Chord & User Area
-
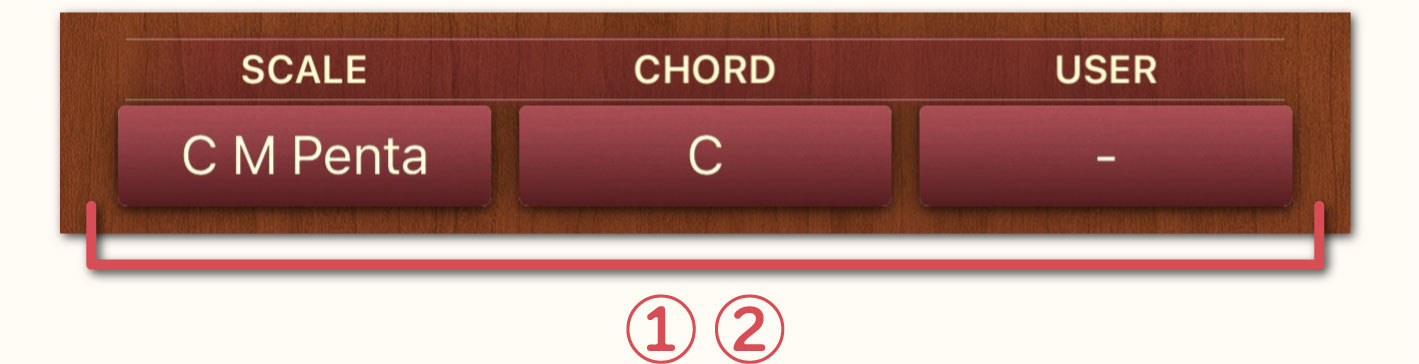
Tapping the button opens a separate window where you can select from the scales registered in the application.
-
If identical pedal positions are registered in the "Scale", "Chord" and "User" settings multiple settings may be displayed simultaneously. On the Settings Screen, setting the [Preset Function] to "On (No Detection)" then multiple settings will not be shown simultaneously.
↳Scale, Chord & User Selection Screen (Separate Window)
-
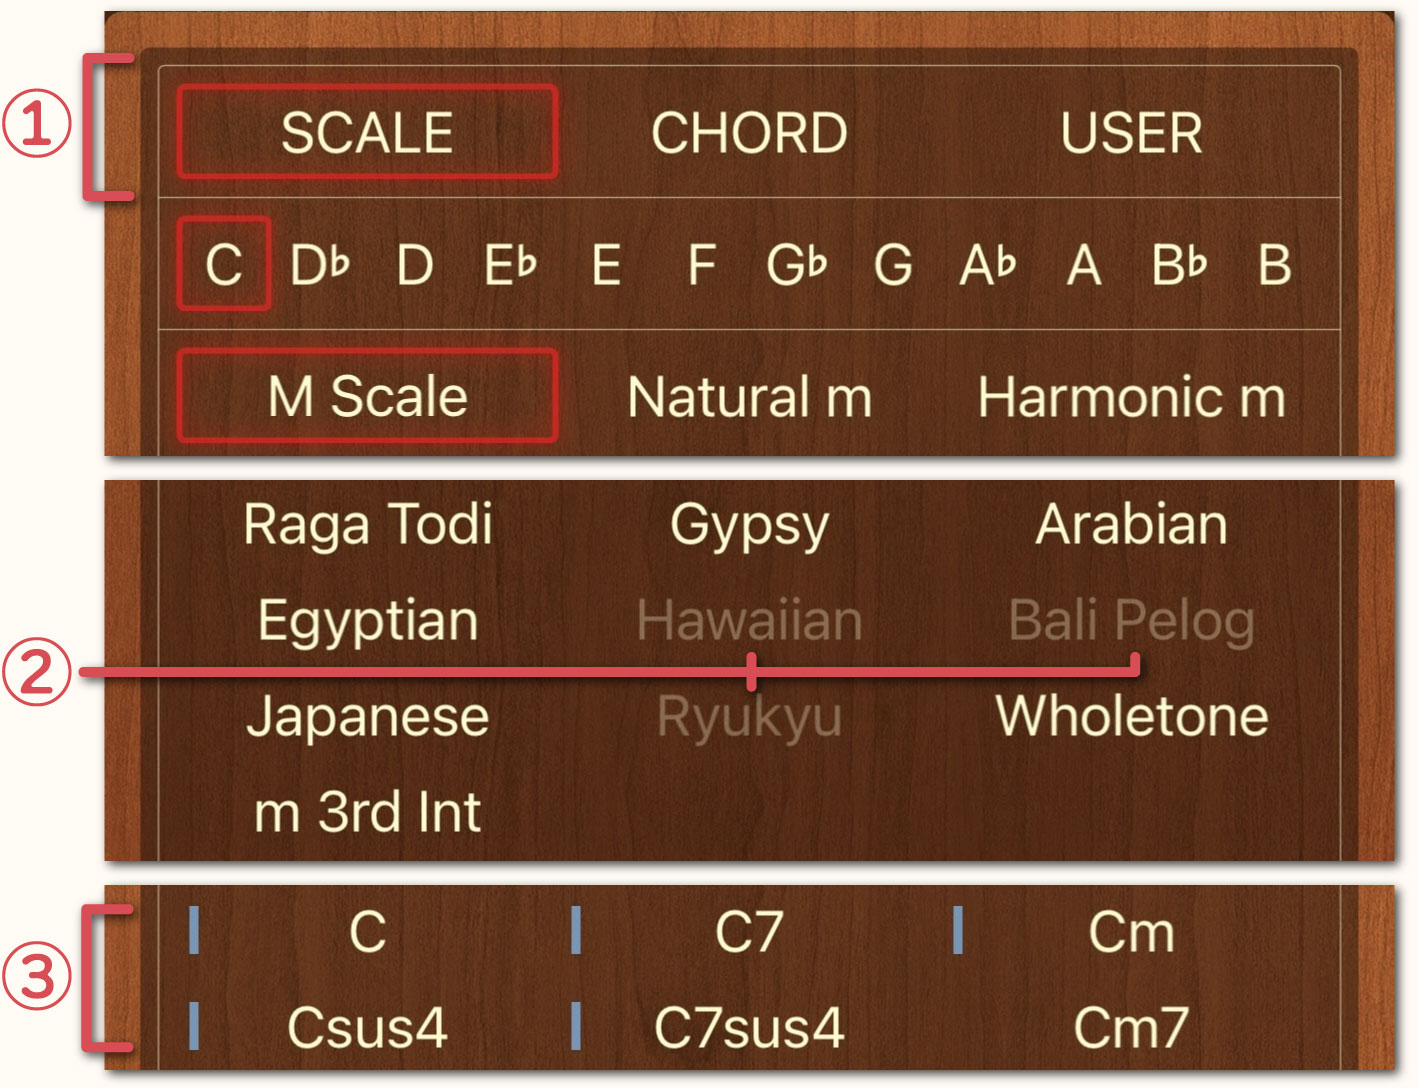
It is possible to tap the buttons on the top of the window to switch between "Scale", "Chord" and "User".
-
If no corresponding pedal position exists, the text will appear grayed out and cannot be selected.
-
If a chord contains notes other than those that constitute the chord (non-harmonic tones), a light blue line will appear before the chord name.
↳Hide the Scale, Chord & User Selection Screen
On the Settings Screen, setting the [Preset Function] to "Off" will hide the "Scale", "Chord" and "User" buttons.
↳User Registered Scales Selection Screen (Separate Window)
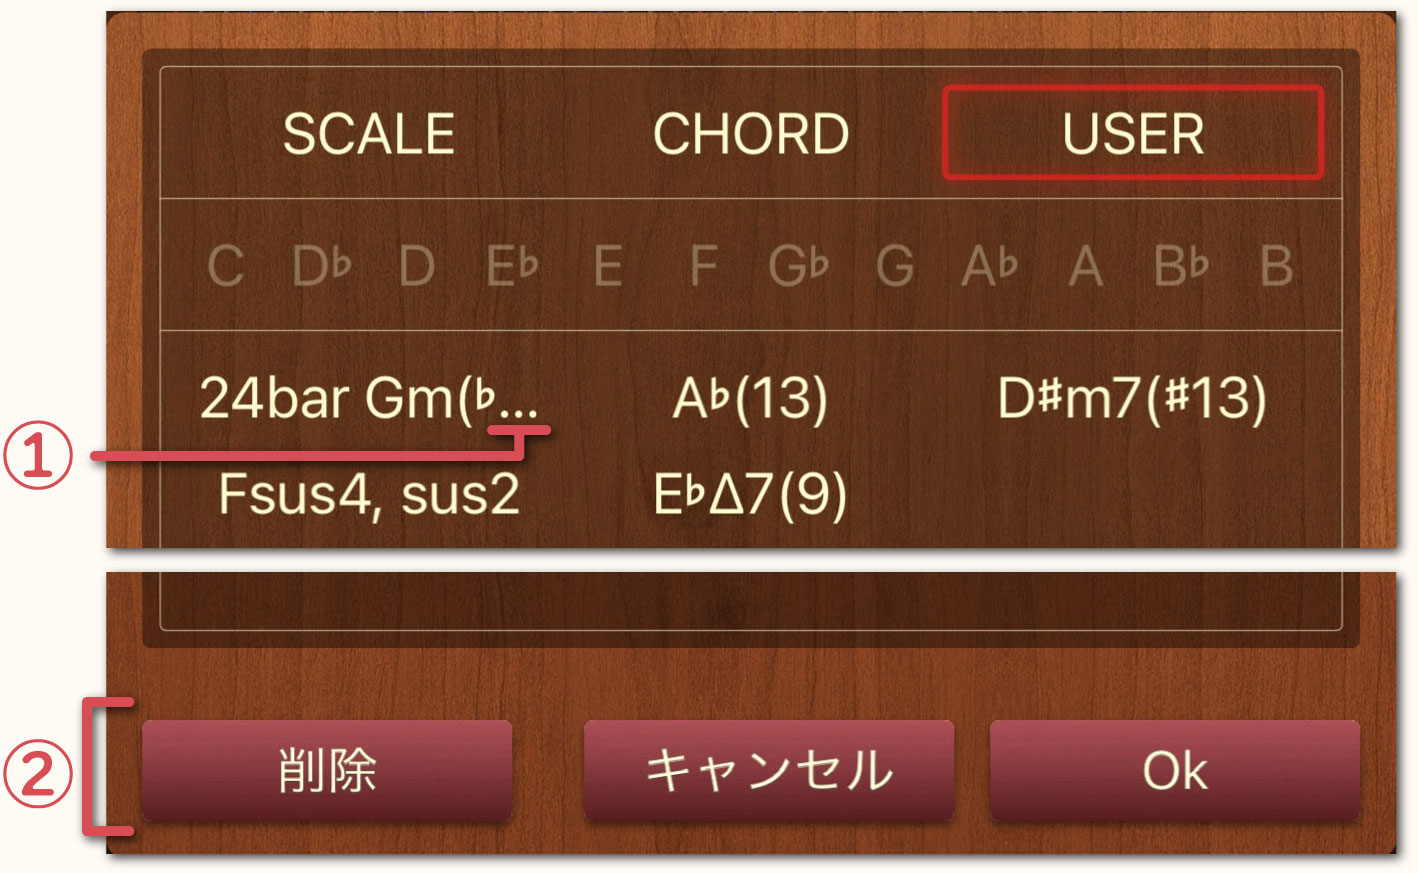
-
If the registered name exceeds the display range an ellipsis will be displayed at the end to indicate that there is part of the name that isn't being displayed. Tapping the name will cause the text to scroll after a few seconds, allowing you to see the entire name.
-
Select the registered item you with to delete and then tap the "Delete" button.
Keyboard Area
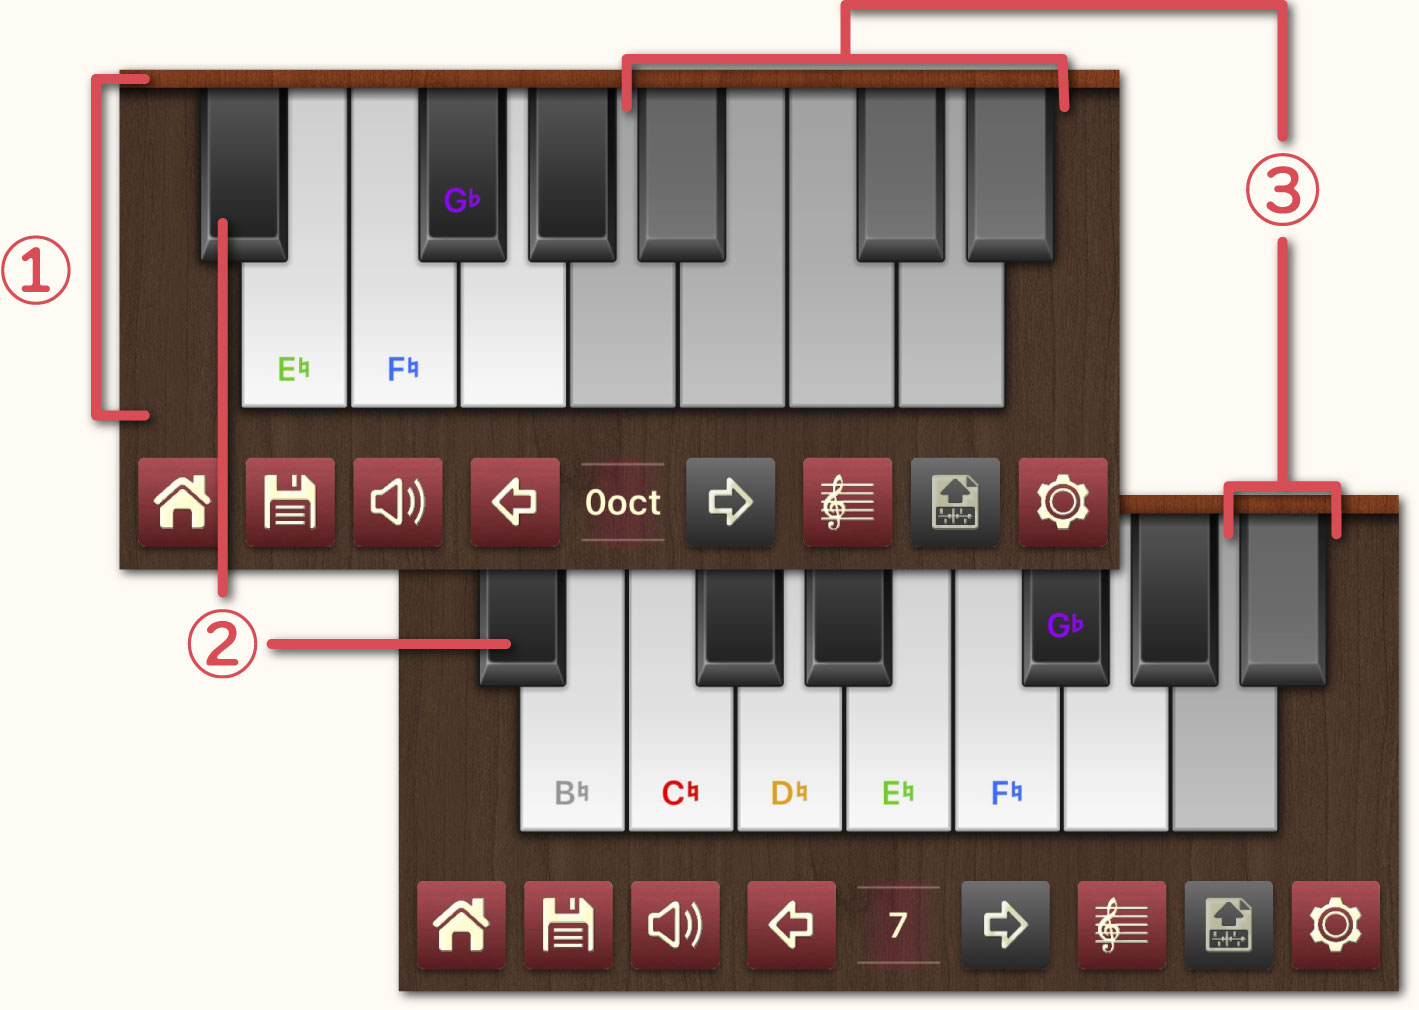
-
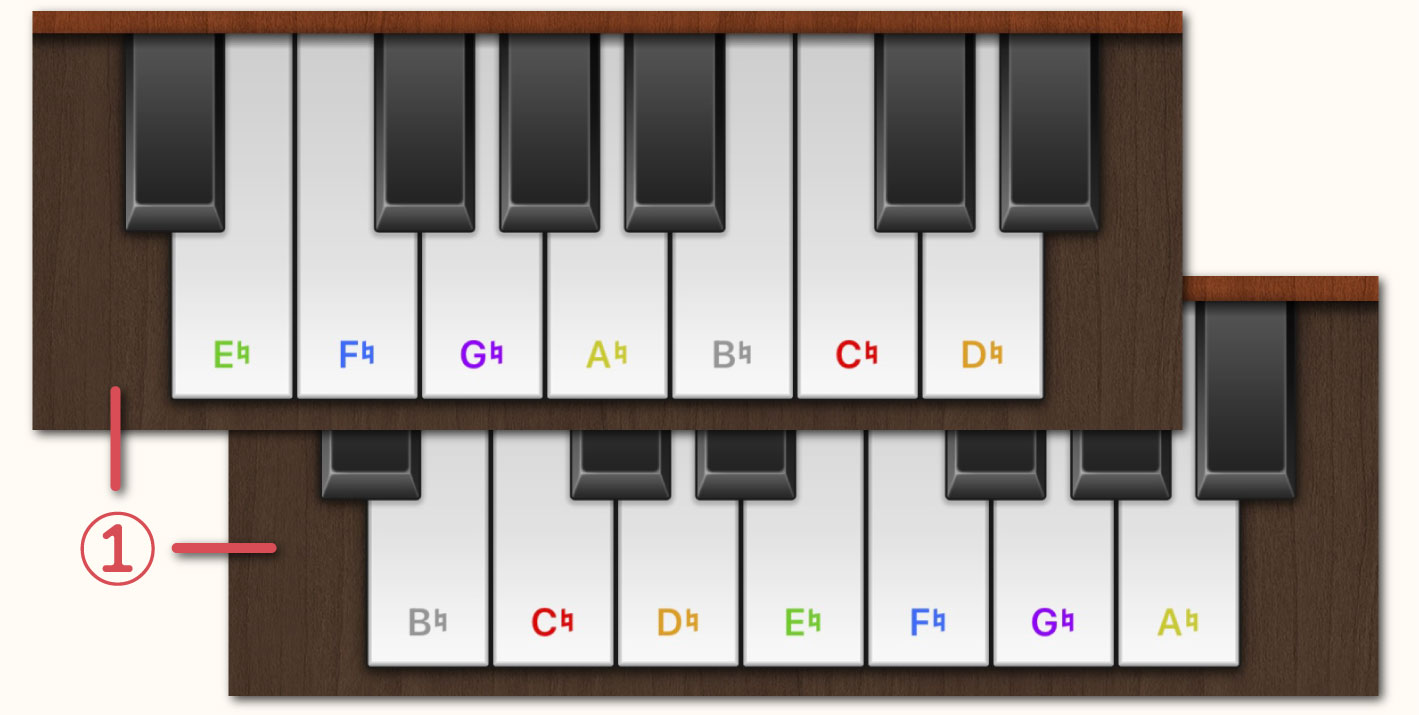
Tap the keys to hear the notes played in the sound of the harp.
-
On the Settings Screen, it is possible to set the [Keyboard Style] setting to either "Harp" or "Standard". The "Harp" style starts from Mi while the "Standard" style starts from Si. For detailed instructions, please refer to the Keyboard Style section.
-
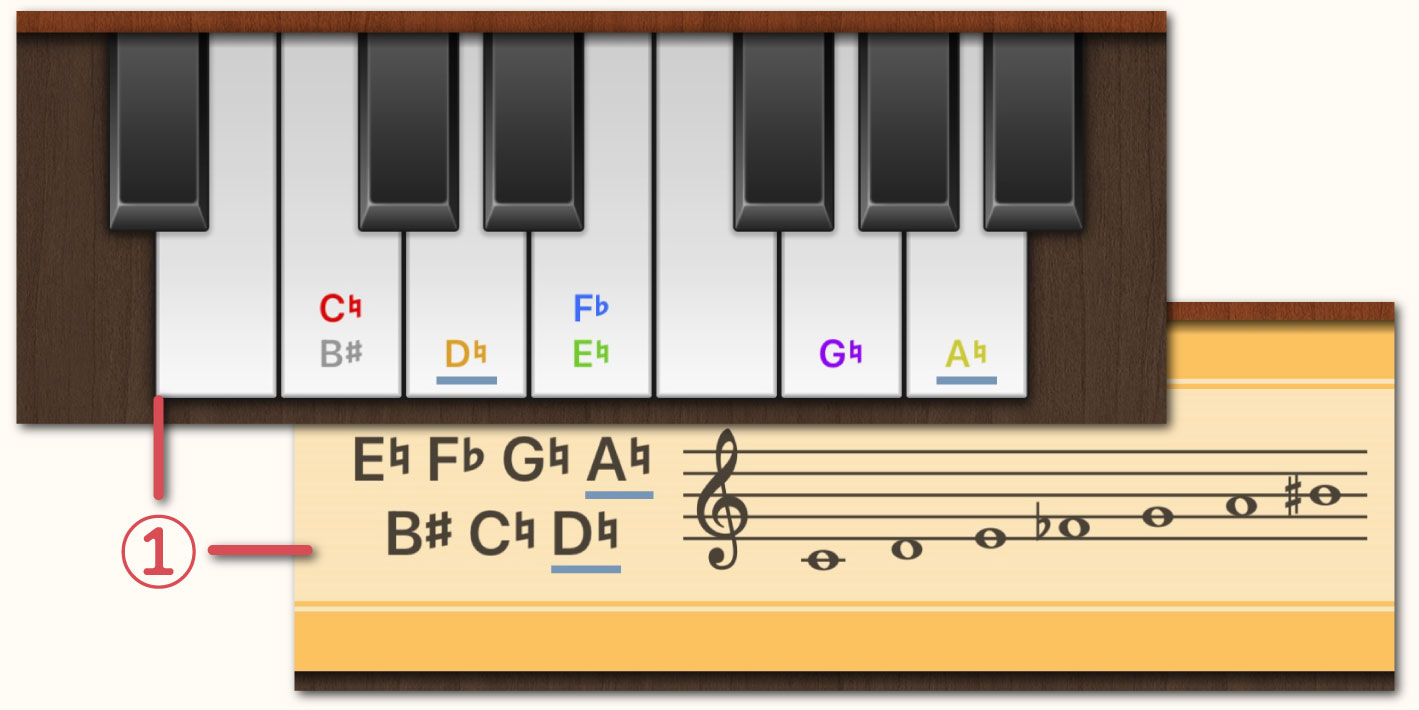
Keys displayed in gray indicate notes that are outside of the standard harp's range. However, if you use irregular tuning (for example, C♭♭) and set the 7 oct. C to "Follow Pedal", you can play notes beyond the standard range up to B♭. When these conditions are met, the corresponding keys will switch from gray to their normal display.
Additionally, when the display reaches the lowest or highest note via the menu bar's “Octave Down/Octave Up” function, the notation for 7th octave C, 7th octave D, and 0th octave G will not change even when the pedal is operated. However, on the Settings Screen if the [7th oct. C, 7th oct. D, 0 oct. G Tuning Settings] is set to "Follow Pedal", the display will change according to pedal operation.
↳Non-harmonic Tone Mark
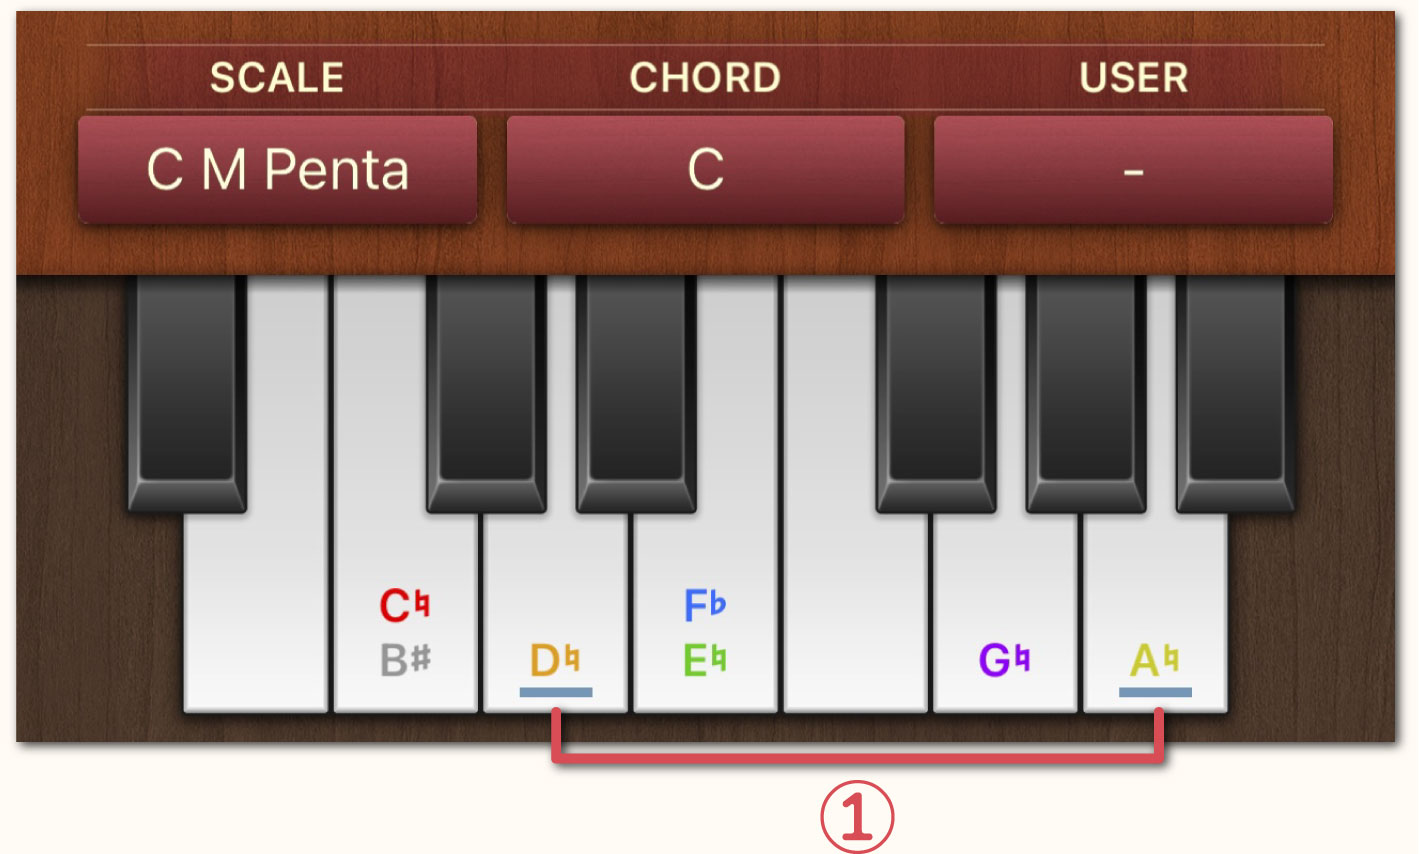
-
If the selected chord contains non-harmonic tones, a light blue line will appear on the keyboard.
Example: The notes of the C chord are Do, Mi, and Sol, consequently, Re and La are non-harmonic tones of the C chord.
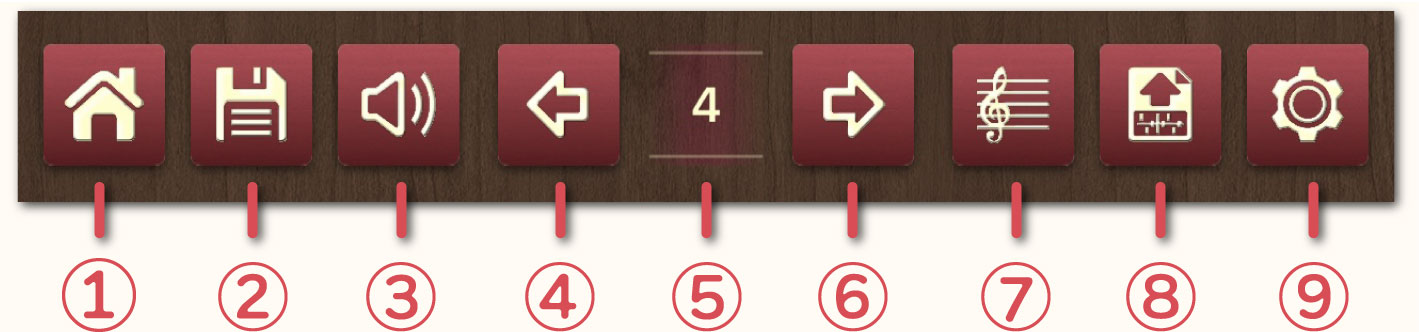
Menu Bar Area
-
"Home" Button: Return to the title screen.
-
"Save" Button: Save the current pedal state. Up to 999 states can be saved.
-
"Mute" Button: Mute the sound.
-
“Octave Down” Button: Lower the octave./div>
-
 “Octave”: Display the current octave.
-
 “Octave Up” Button: Rais the octave.
-
 “Keyboard / Score” Button: Switch between Keyboard Mode and Score Mode.
-
 "Transfer" Button: Transfer the current pedal state as a diagram to music notation software such as Sibelius or Dorico. To use this feature, please install the “Handy Harp 2 Client” onto your PC.
-
 "Settings" Button: Move to the settings screen.
↳Keyboard Mode & Score Mode
-
Pressing button ⑦ on the Menu Bar will toggle between Keyboard Mode and Score Mode.
Landscape Play Mode
When you use your iPhone or iPad in landscape orientation the application switches to Landscape Play Mode. In this mode, the Play Area becomes wider than in Portrait Mode, making it easier to play.
↳Velocity Slider
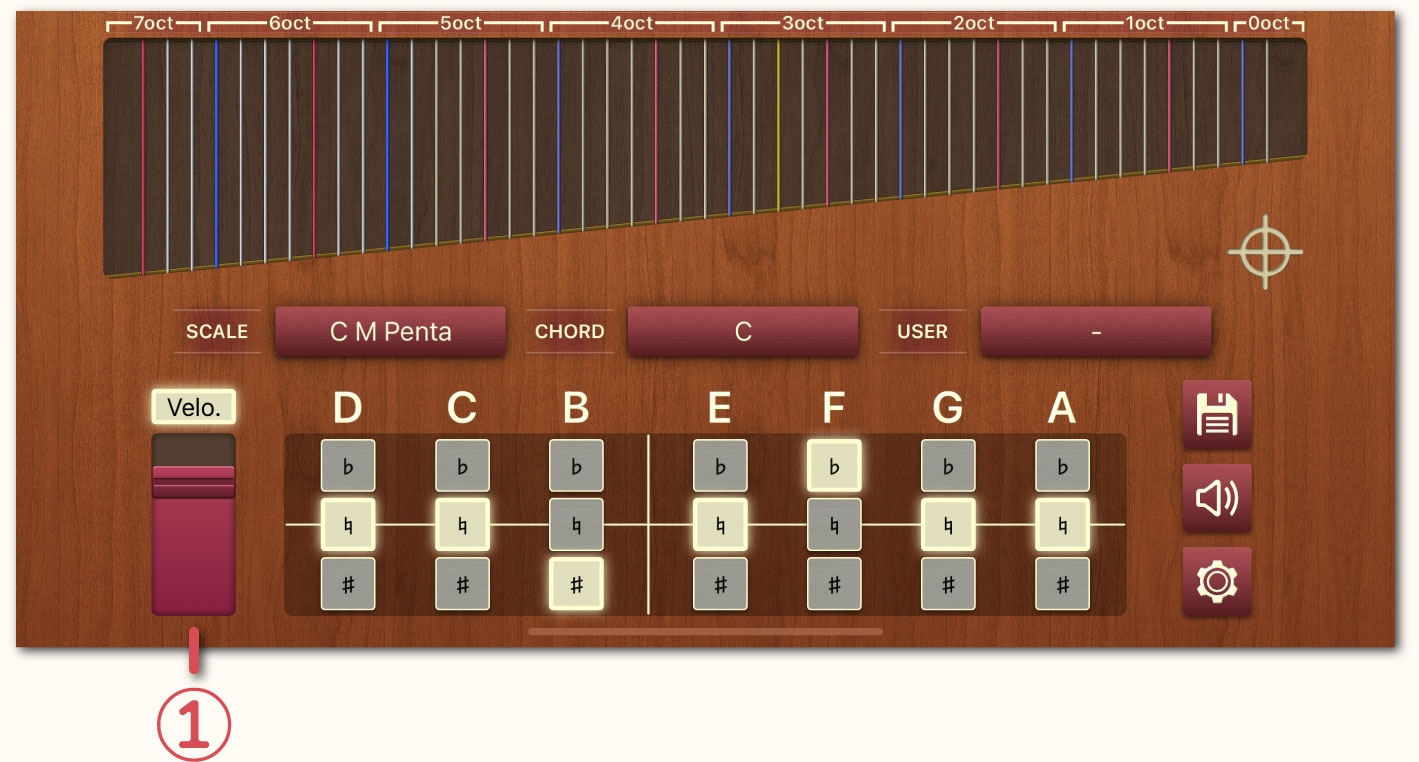
-
The Velocity Slider appears only in the Landscape Play Mode. Moving it up or down during performance allows real-time control of dynamics. Furthermore, this velocity information is also output to externally connected MIDI devices.
Settings Screen
Master Volume
Adjust the volume by moving the slider left or right. If you experience distortion or noise, lowering the master volume may help. Double-tap any item name to reset its settings to default.
Velocity
Set the velocity when playing.
Master Tuning
Master Tuning can be set within the range between 410Hz to 480Hz. The default value is 440Hz.
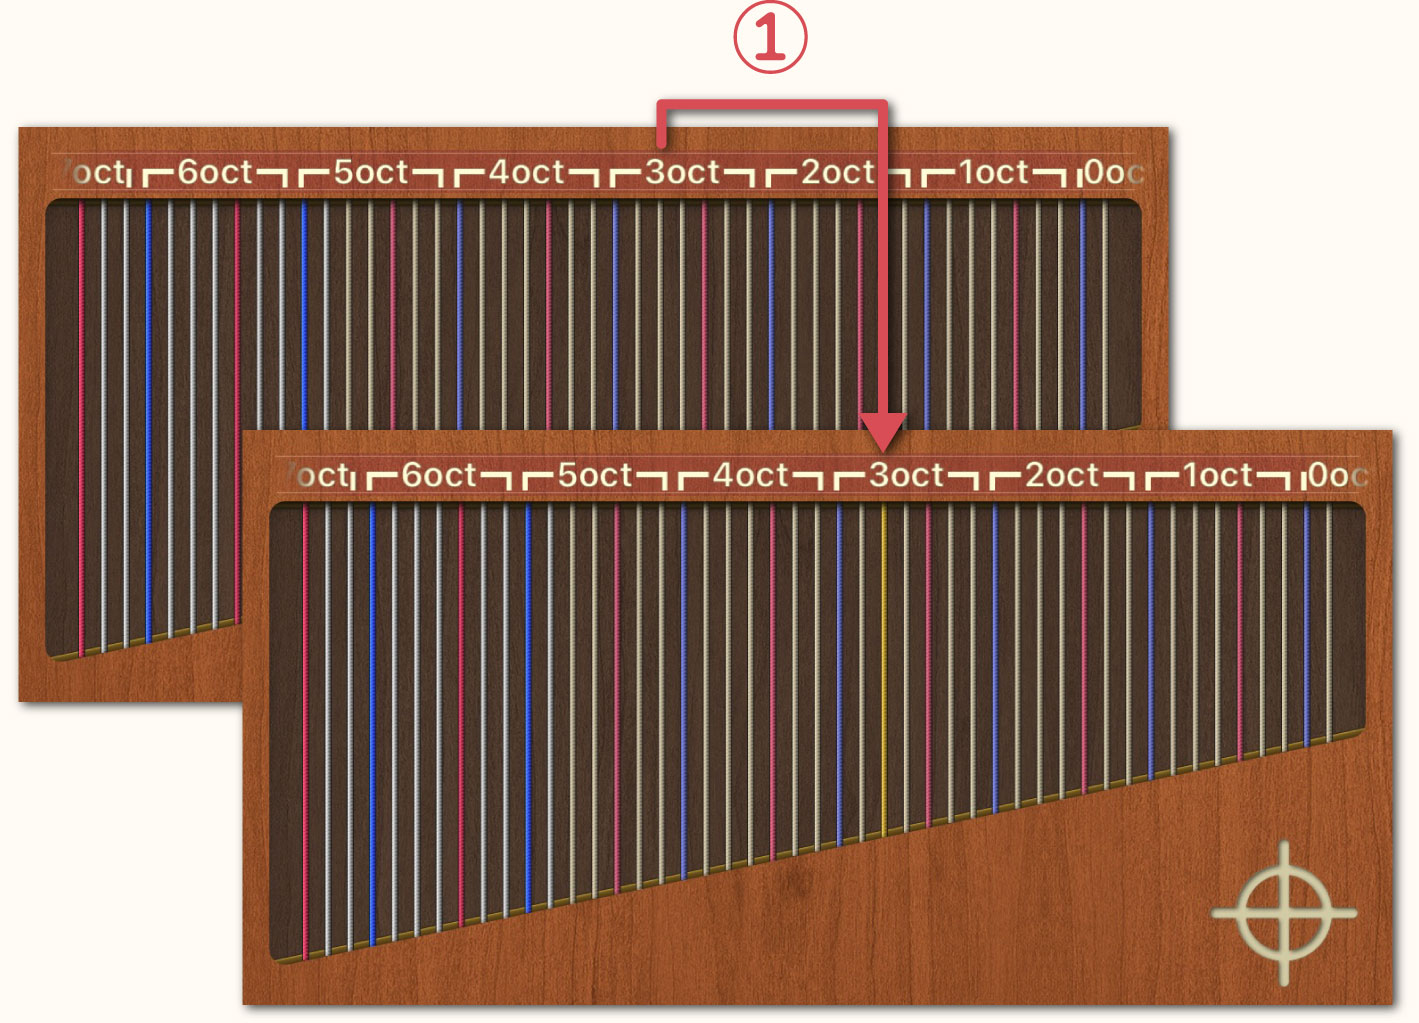
Performance Range
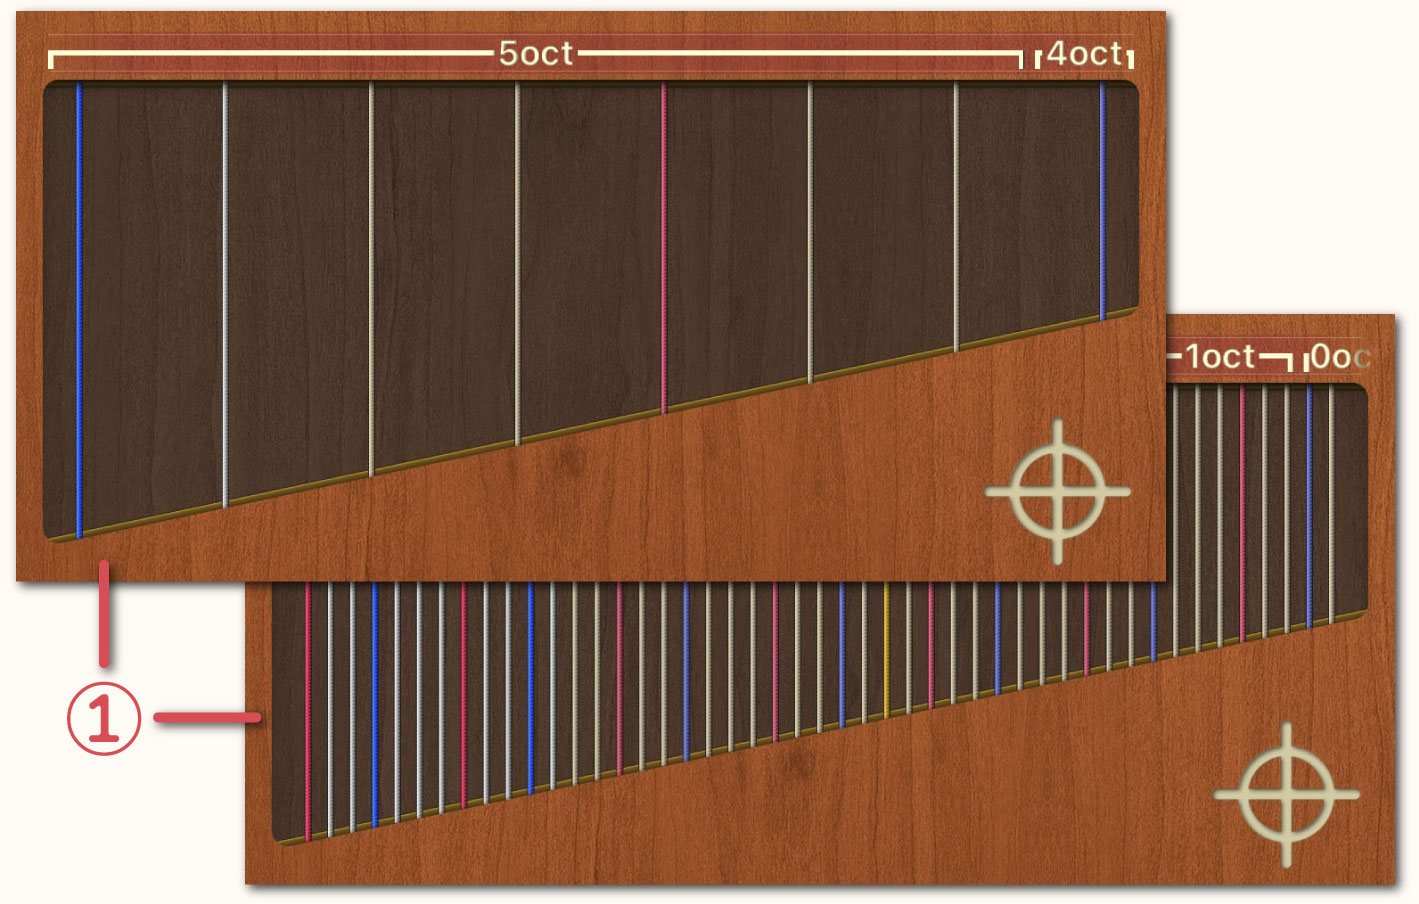
-
Use the upper slider to set the upper limit of the Performance Range of the “Play Area” and the lower slider to set the lower limit. The difference between the upper and lower limits (the playable range) cannot be set to less than one octave.
Tuning
Special tuning configurations can be set for unique playing techniques. However, adjustments to increase string tension by raising the pitch are not supported.
↳Tuning settings for 7th oct. C, 7th oct. D and 0 oct. G
Depending on the harp model, specifications for the treble strings (G7/0 oct. G) and bass strings (C1, D1/7th oct. C, 7th oct. D) may vary. These treble and bass strings are generally tuned flat (♭), but can be adjusted to suit the piece of music.
3rd oct. A String
-
Selecting “Highlighted” will emphasize the A string by giving it a yellow color.
Pedal Design
-
The "Pedal Area" design can be customized to your preference among three options: "Real", "Diagram" and "Paper".
Preset Function
-
If any of the pre-registered “Scale” and “Chord” entries match the currently assigned pedal positions, you can choose whether to display them or not. Additionally, if you select "Off" in the display settings, the entire "Scale, Chord & User Area" will be hidden.
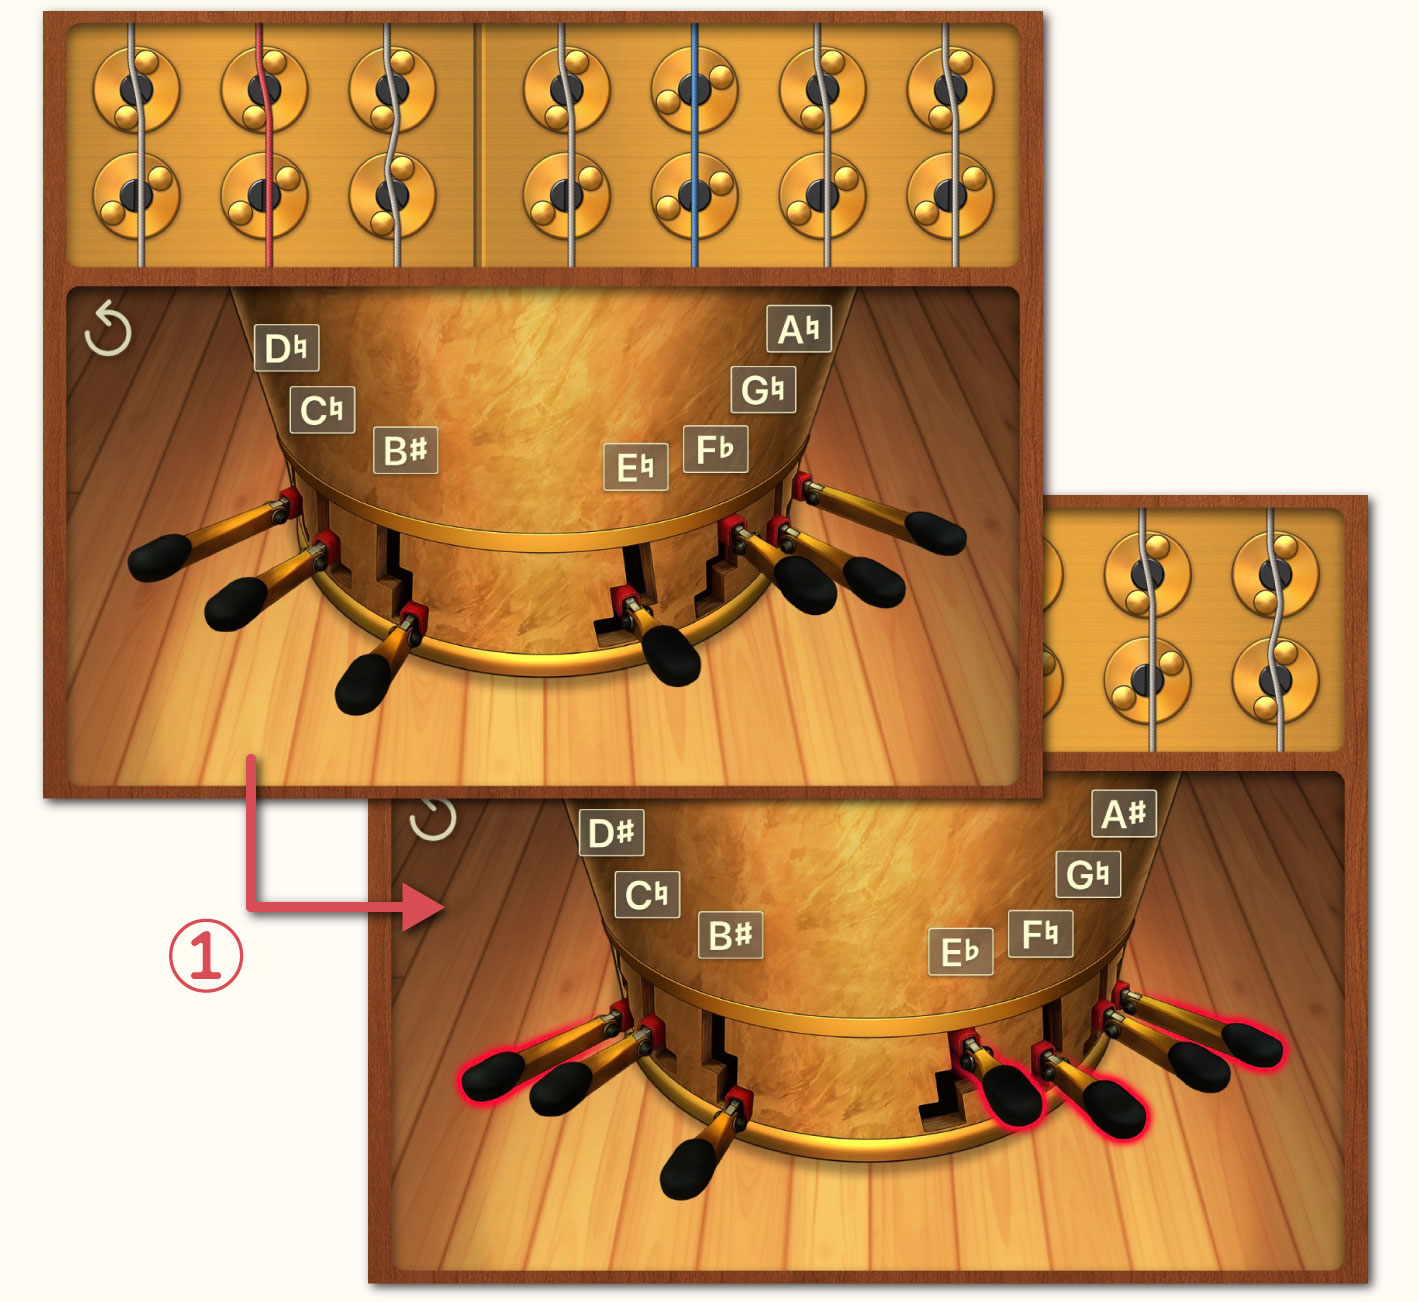
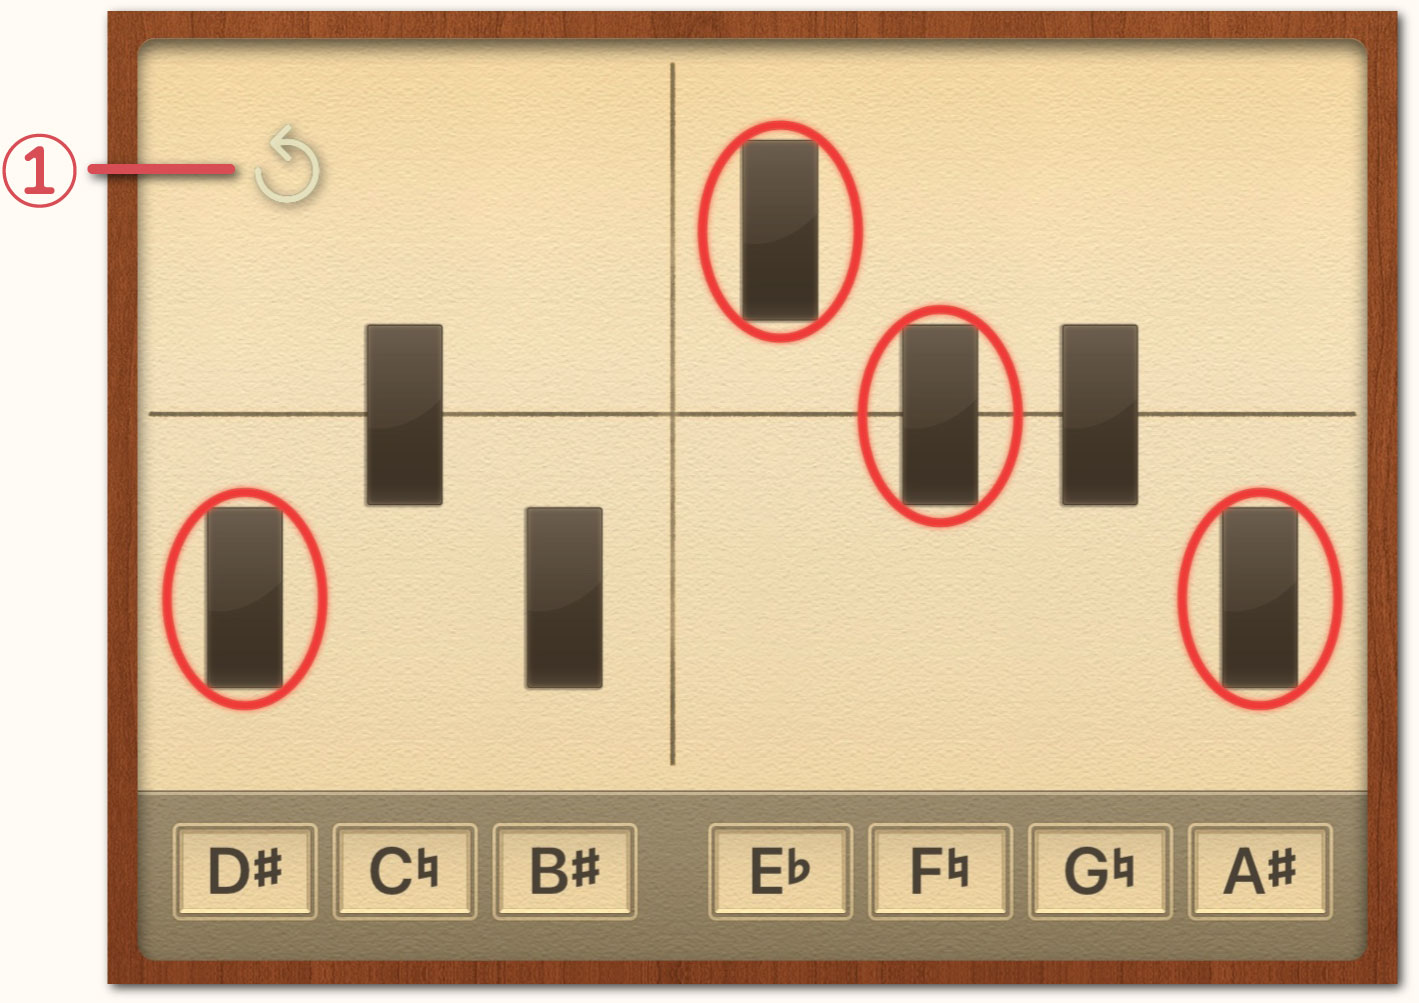
Show Changes
-
Selecting "Enabled" will display red circles around the pedal positions you modified. Double-tapping the “Pedal Area” will clear the red circles and the current pedal positions will become the new default pedal positions.
↳Reset Button
-
Enable this option in order to clear the red circles with a single tap. When enabled, a "Reset Button (↺)" will appear. The Reset Button is movable and can be freely positioned in a location that is easy to tap.
Note Style
-
You can choose between notation for harpists and standard notation.
Keyboard Style
-
When "Harp" is selected the keyboard display will start from E♭. When "Standard" is selected the keyboard display will start from B♭.
Bluetooth MIDI
Set up Bluetooth MIDI to transfer performance data to your DAW software. Please note that your Bluetooth cache may cause issues with Bluetooth MIDI connections. If the connection is unstable or the device cannot be found, try the following steps.
-
Turn Bluetooth off
-
To Bluetooth back on
-
Delete the registered device
-
Re-connect to the device
-
 When using a Mac, Handy Harp II operates stably. However, on Windows, due to the characteristics of the BLE stack, latency is more likely to occur and compatibility issues are more likely to arise, so it does not function properly with standard Windows Bluetooth MIDI. Handy Harp II complies with the “Bluetooth LE MIDI (MIDI over Bluetooth Low Energy)” specification. However, due to the reasons mentioned above, problems may occur in Windows environments. Therefore, when using Windows, we recommend using CME's Bluetooth MIDI devices (such as WIDI Bud Pro, WIDI Uhost, WIDI Thru6 BT, etc.).
-
When connecting from Handy Harp II
-
[For Mac]
-
Launch "Audio MIDI Setup.app" from the "Applications" → "Utilities" menu.
-
Select "Show MIDI Studio" from the "Window" menu in the menu bar.
-
Click the Bluetooth icon in the upper-right corner of the "MIDI Studio" window.
-
When the “Bluetooth Configuration” window appears, click “Advertise” to put your Mac into standby mode.
-
Select "Open" from Handy Harp II's "Bluetooth MIDI" menu option, then tap “Connect to ...”
-
The name of your Mac device will appear in the "Bluetooth MIDI Devices" window. Tap it to connect.
-
When connected successfully, "Connected" will be displayed.
-
Select the desired device for the "MIDI Destination" and "MIDI Source" options, which are located below the "Bluetooth MIDI" option.
-
[For Windows]
-
Connect CME's Bluetooth MIDI device to your PC.
-
Select "Open" from Handy Harp II's "Bluetooth MIDI" menu option, then tap “Connect to ...”
-
The CME device name will appear in the "Bluetooth MIDI Devices" window. Tap it to connect.
-
When connected successfully, "Connected" will be displayed.
-
Select the desired device for the "MIDI Destination" and "MIDI Source" options, which are located below the "Bluetooth MIDI" option.
-
When connecting from a PC
-
[For Mac]
-
Launch "Audio MIDI Setup.app" from the "Applications" → "Utilities" menu.
-
Select "Show MIDI Studio" from the "Window" menu in the menu bar.
-
Click the Bluetooth icon in the upper-right corner of the "MIDI Studio" window to display the "Bluetooth Configuration" window.
-
Select "Open" from Handy Harp II's "Bluetooth MIDI" menu option, then tap “Wait for ...”
-
Enable "Advertise MIDI Service".
-
Handy Harp II will appear in your Mac's "Bluetooth Configuration" window. Click the “Connect” button to connect.
-
When connected successfully, the Handy Harp II screen will display "Connected to *** (computer name)".
-
Select the desired device for the "MIDI Destination" and "MIDI Source" options, which are located below the "Bluetooth MIDI" option.
-
[For Windows]
-
Due to issues with Bluetooth MIDI specifications on Windows, we currently do not support connecting from a Windows PC to the Handy Harp II.
Network MIDI
Using Network MIDI (RTP-MIDI) enables you to transfer performance data to your DAW software over a network. Please note that latency may occur depending on your Wi-Fi environment (especially on the 2.4GHz band). If Wi-Fi latency is a concern, we recommend connecting via a wired LAN connection.
-
Wi-Fi router settings (for optimized usability)
-
 Please use the 5GHz band (Wi-Fi 5 / Wi-Fi 6).
* The 2.4GHz band is prone to congestion and susceptible to delays and noise interference.
-
RTP-MIDI uses UDP communication. The port number used (e.g., 5004) varies depending on the environment.
-
Please verify that the UDP communication for RTP-MIDI applications (such as rtpMIDI / DAW) is not blocked by a firewall on your PC.
-
Please enable multicast.
* IGMP snooping is usually fine when set to “On”, however, if the connection becomes unstable, turning it off may improve the situation.
-
If your router has QoS (Quality of Service) functionality, it can help reduce MIDI communication delays. (This is not required.)
-
How to connect using Network MIDI (RTP-MIDI)
-
[For Mac]
-
Launch "Audio MIDI Setup.app" from the "Applications" → "Utilities" menu.
-
Select "Show MIDI Studio" from the "Window" menu in the menu bar.
-
Click the globe icon labeled "MIDI Network Setup" in the upper-right corner of the "MIDI Studio" window.
-
When the "MIDI Network Setup" window appears, click the "+" button in the "My Sessions" section to create a new session (one may already exist).
-
Enabling "Network MIDI" on Handy Harp II will display your device name under "Directory".
* Your Mac and Handy Harp II must be connected to the same network (Wi-Fi / wired LAN).
-
Select the device name you want to connect to, then click the "Connect" button.
-
Once connected successfully, the device will appear in the "Configuration" section on the right.
-
Select the created network MIDI session (connected device name) in the "MIDI Destination" or "MIDI Source" options, which are located below the "Bluetooth MIDI" option.
-
If you cannot connect, please check your macOS firewall settings and ensure no other MIDI applications are using the session simultaneously.
-
[For Windows]
-
Install rtpMIDI (by Tobias Erichsen).
* Please download it from the official website.
-
After installation, restart Windows.
-
Launch rtpMIDI and click the "+" button in the "My Sessions" section to create a new session (it may already exist).
-
If the session name is not checked, check it.
-
Enabling “Network MIDI” on Handy Harp II will display your device name in “Session and Directory”.
* Windows and Handy Harp II must be connected to the same network (Wi-Fi / wired LAN).
-
Select the device name you want to connect to, then click the "Connect" button.
-
Once connected successfully, the device will appear in the "Participants" section on the right.
-
Select the created network MIDI session (connected device name) in the "MIDI Destination" or "MIDI Source" options, which are located below the "Bluetooth MIDI" option.
-
If you cannot connect, please check your Windows firewall settings and ensure no other MIDI applications are using the session simultaneously.
↳MIDI Destination
When you connect a MIDI device to your iPhone or iPad using a USB cable, the device name will appear and you can connect to it. If there is a device connected via "Bluetooth MIDI" or "Network MIDI", the device name will also appear. Select the device you want to send MIDI data to from the list.
-
If you are using a Mac, IDAM (Inter-Device Audio and MIDI) is also supported.
↳MIDI Source
When using Handy Harp II as a sound source, connect it to your MIDI device via a USB cable. If the MIDI device is compatible, its name will appear in the "MIDI Input Source" list. Select it from there.
-
Please note that setting the same device as both the "MIDI Destination" and the "MIDI Source" may cause MIDI signals to loop.
-
If you are using a Mac, IDAM (Inter-Device Audio and MIDI) is also supported.
↳Regarding Virtual MIDI
Virtual MIDI is a feature that enables MIDI signal exchange between Handy Harp II and other music apps (such as sequencers or keyboards) installed on your iPhone or iPad. Any app supporting Virtual MIDI can be connected and used. When using Virtual MIDI, please ensure that "Background Audio" for Handy Harp II is set to "Enabled".
↳Gate Time
When transferring performance data from Handy Harp II to DAW software, you can set the note duration (Gate Time). The default setting is 300ms. However, if notes of the same pitch (e.g., E and F♭, C♭ and B, etc.) are input consecutively, in order to avoid duplicate MIDI data, the gate time of the note sounding first will automatically end upon the next note on event.
↳Velocity Conversion
Handy Harp II allows you to choose whether to enable or disable velocity when receiving MIDI data from external devices.
Handy Harp Server
-
Using the Handy Harp server, you can transfer the current pedal positions as a diagram mark to music notation software such as Sibelius and Dorico.
-
Instructions for Use
-
Install the "Handy Harp II Client" onto your PC and launch the software.
-
Set the "Handy Harp Server" setting to the "Wait" status.
-
Once connection to the PC is complete, "Connected" and an illuminated green light will be displayed.
-
Upon returning to the Play Screen, the "Transfer" Button (⑧) in the "Menu Bar Area" becomes active.
-
Each time you press the "Transfer" Button, the current pedal positions are transferred to the music notation software as a diagram mark.
-
If transfer does not work properly on Mac
-
The cause may be due to macOS security settings. Please go through the following steps.
-
Open "System Preferences" → "Security & Privacy" → "Accessibility".
-
Check if “Handy Harp II Client” is listed and turn it on.
-
If it still doesn't work, after deleting “Handy Harp II Client” please add it again.
Background Audio
When set to "Enabled", Handy Harp II can play in the background even when other apps are running.
Voice Limit
Sets the maximum number of sounds that can be produced simultaneously. Lower values may cause sound clipping, while higher values increase the CPU load. If your device is high performance, increasing this value can prevent sound clipping.
Buffer Size
If audio cuts out or noise occurs on your device, increase the buffer size. However, please note that this may increase latency.
Using Bluetooth HFP
If you notice latency when using external headphones or similar devices, enable this option. Please note that while latency is reduced, audio quality worsens.
Auto-Lock
Setting this to "Disabled" prevents your iPhone or iPad from entering sleep mode.
Language
You can set the language to "Automatic", "English" or "Japanese". Selecting "Automatic" will apply the language set in your OS.
Reset All Settings
To reset all settings to their default values, tap "Execute".
Other
Regarding the Selection Method for Chords
The pedal settings for registered chords are determined based on common glissando chord-tone conventions, following the priority order below. This is merely one example emphasizing chord tones, and settings may vary significantly depending on the chord's function and adjacent pedal configurations. Refer to the "Non-harmonic Tone Marks" displayed on the keyboard and experiment with various pedal settings. Particularly for chords with high tension, intentionally omitting tension tones or the root note may sometimes yield more beautiful glissando chord tones.
① Set all pedals to the flat position.
② Seventh note (skip to next if not present in the chord)
③ Fifth note
④ Third note (or fourth note in the case of a suspended fourth)
⑤ Root note (If used as the seventh note, change it to the root note)
⑥ Sixth note (skip to next if not present in the chord)
⑦ Ninth note (skip to next if not present in the chord)
⑧ Eleventh note (skip to next if not present in the chord)
⑨ Thirteenth note (skip to next if not present in the chord)
At this point, we process the remaining non-harmonic tones.
⑩ Move adjacent notes so they do not form a half step.
⑪ When five or more semitones are contained between constituent notes (such as an augmented third or perfect fourth):
For major chords, select notes from the major scale.
For minor chords, select notes within the descending melodic minor scale.
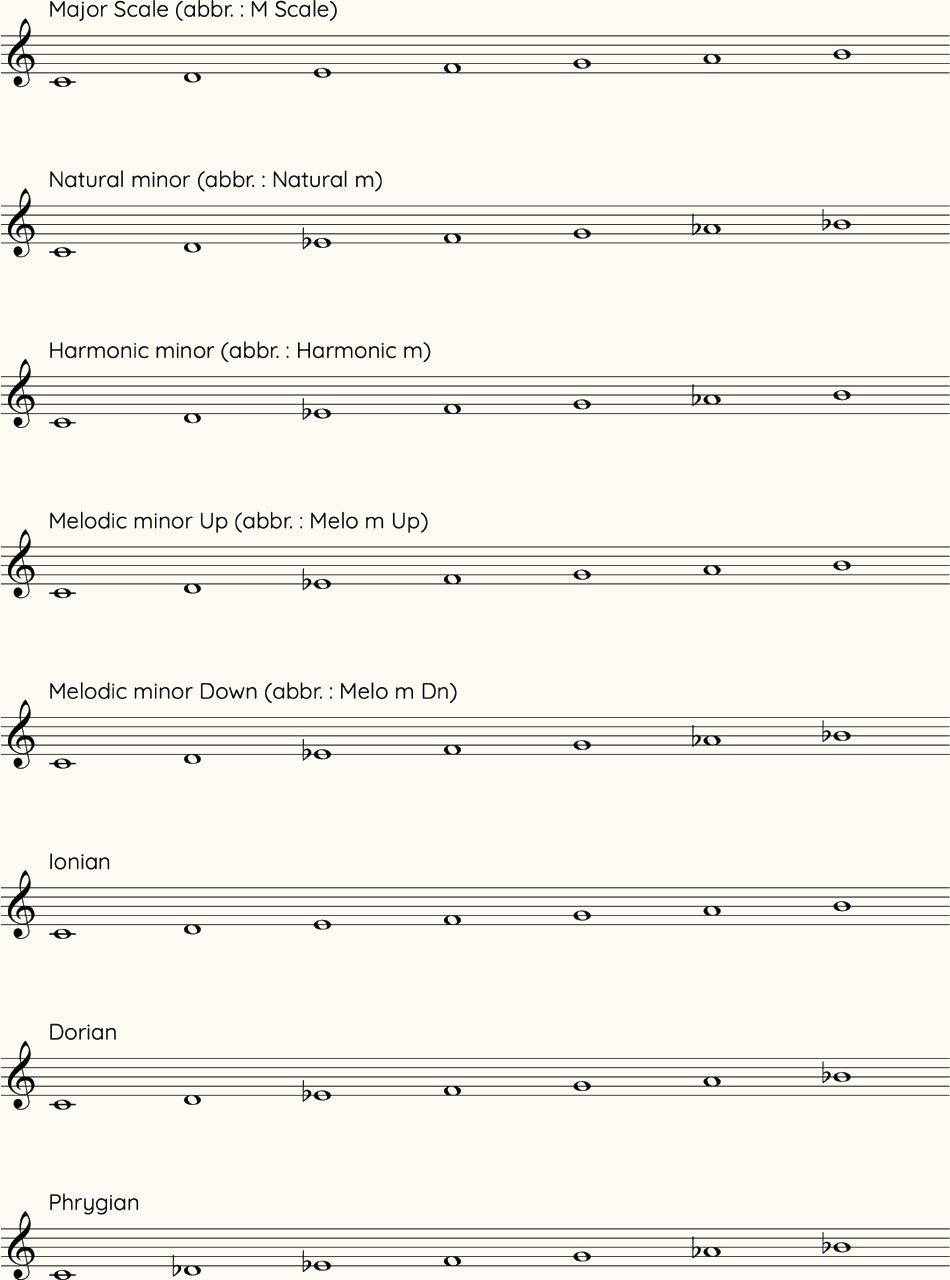
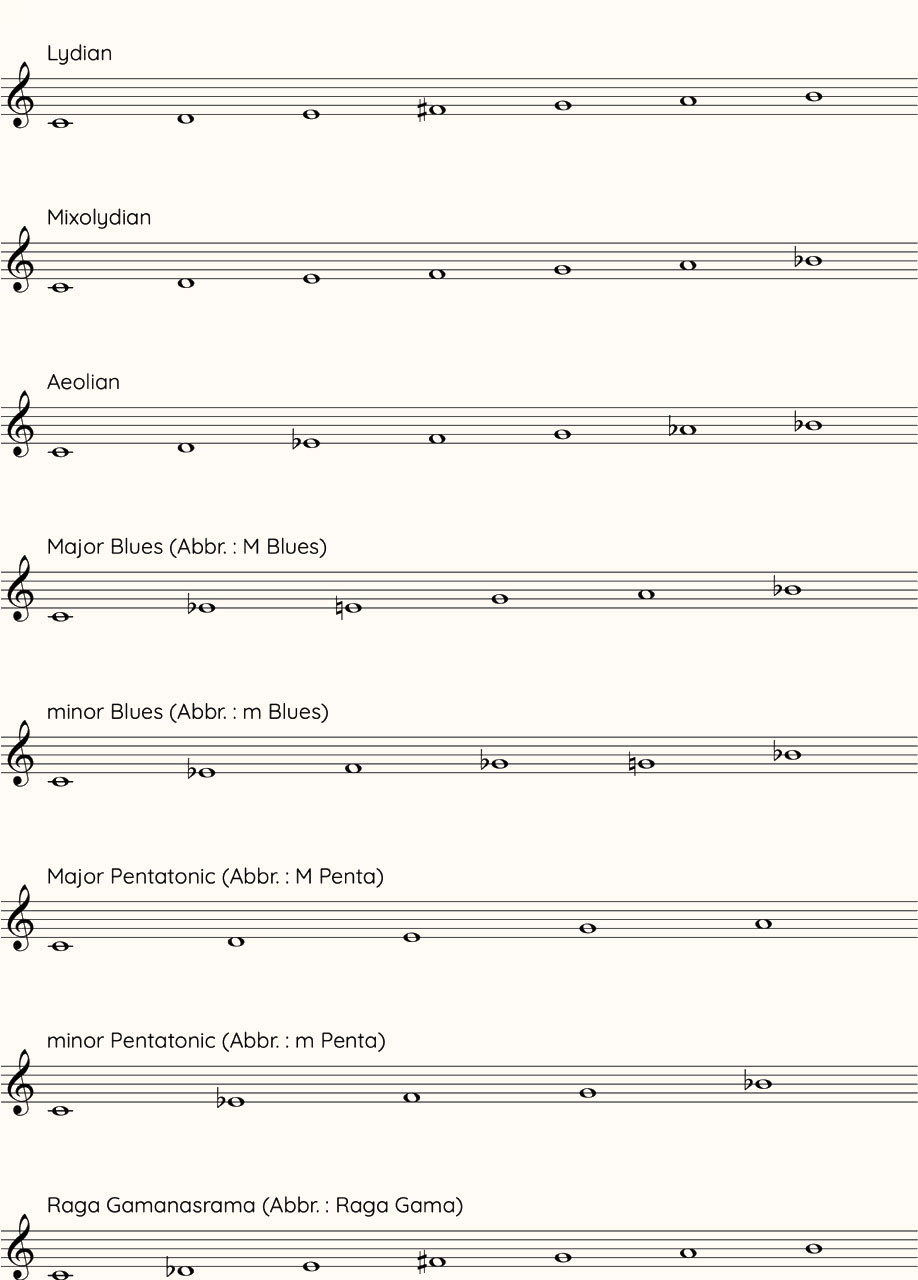
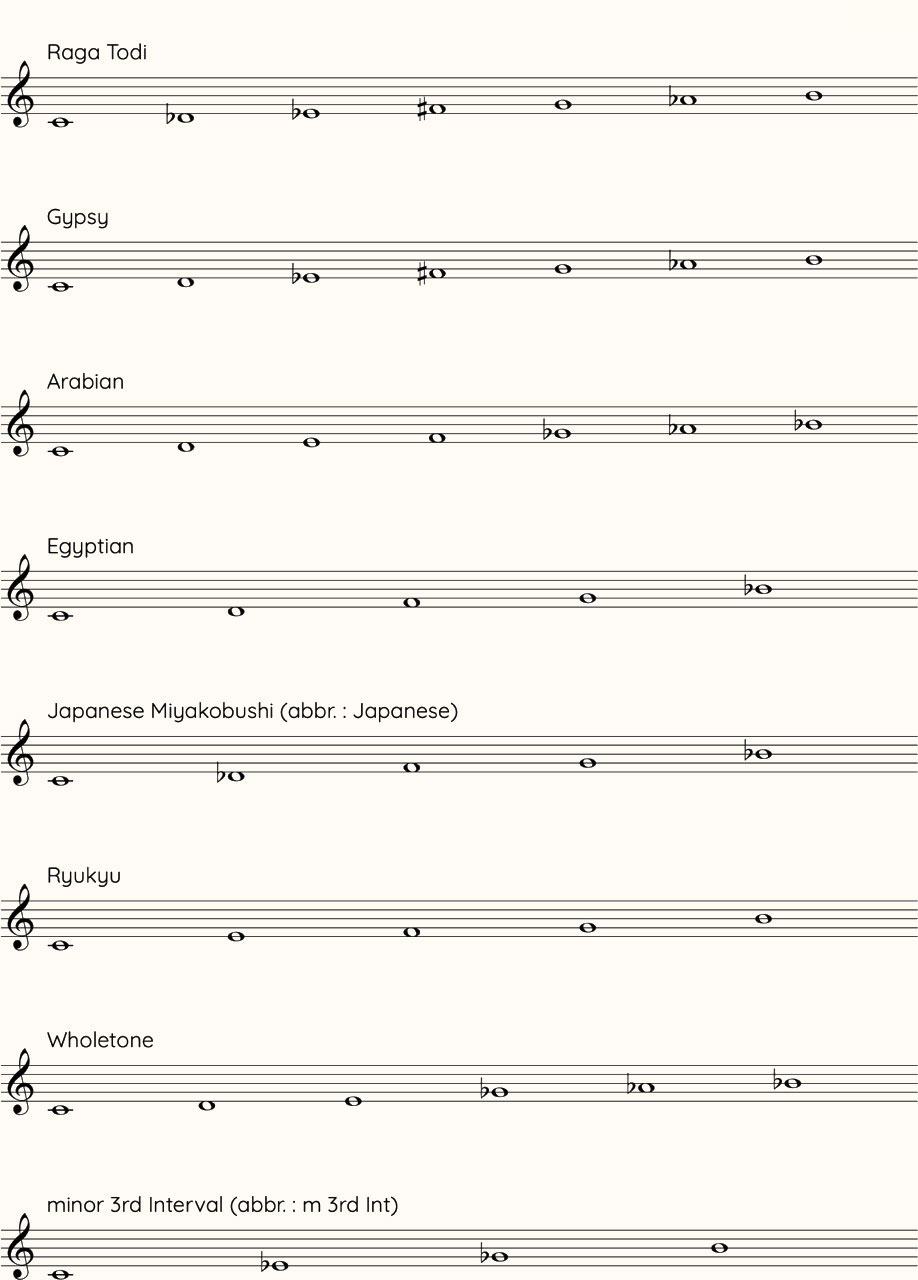
⑫ When two non-harmonic tones occur consecutively, they are consolidated into a single tone that meets the above conditions.List of Included Scales
Afterword
Mastering the pedal functions of the harp requires considerable time and experience. This application was born from the desire to clearly illustrate the harp's complex mechanisms through audiovisual elements, making learning accessible anytime and anywhere. Now, as "Handy Harp II", the application has been upgraded in both functionality and usability, evolving into a more practical and intuitive learning tool. True to its name, I hope "Handy Harp" brings the harp closer to you and allows you to experience it more deeply. I sincerely hope “Handy Harp II” will further expand everyone's interest in the harp, become a reliable partner for harpists and serve as a bridge connecting harpists with composers and arrangers.
Composer Yasunori MitsudaRegarding the Paper Pedals
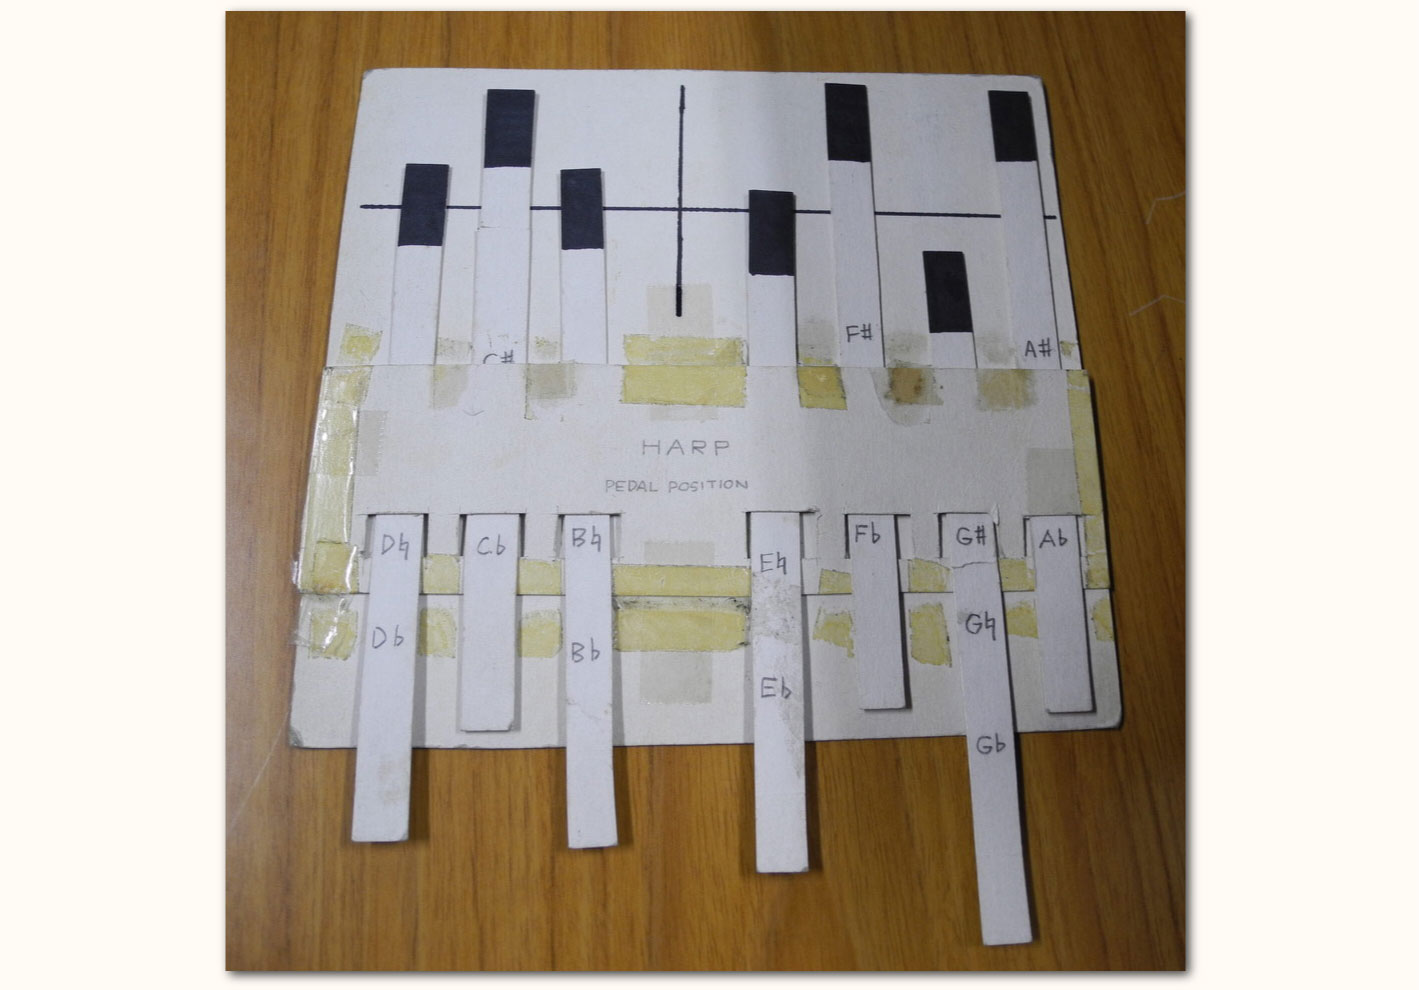
-
These "Paper Pedals" were the prototype tool for this application. The presenter, Mr. Asakawa, created this paper pedal diagram and used it to explore different pedal configurations. As this pedal design is essential for Handy Harp II, we have used this design for this application as well.
Regarding this Instruction Manual
IIIHandy IIIHarp II Instruction Manual
2025年12月25日 Version 1.0.0.20251225
Manual Author: Yasunori Mitsuda
Web Design Layout, Translation (English): Tom Mitchell
Cooperation: Tomoyuki Asakawa
* Unauthorized reproduction, modification or republication of all or part of this manual's content on the web or elsewhere without the permission of Procyon Studio Co., Ltd. constitutes copyright infringement and is punishable under the Copyright Act.Staff Credits
Presenter
Tomoyuki Asakawa
Original Concept & Producer
Yasunori Mitsuda [PROCYON STUDIO]
Programmer
KIRA Ryouta [Kira Q Tech]
Designer
Satoko Tsushima
Production Assistant & Translator
Tom Mitchell [PROCYON STUDIO]
Promotion
Mayu Nozaki [PROCYON STUDIO]
Tom Mitchell [PROCYON STUDIO]
Cooperation
Mami Ashino [PROCYON STUDIO]
Handy Harp II Website
https://www.procyon-studio.co.jp/handyharp2/en/
Copyright
© 2013-2025 PROCYON STUDIO CO., LTD.
© 2025 KIRA Ryouta
All Rights Reserved.
Distributed by
PROCYON STUDIO CO., LTD.Update Details
15 JAN 2026 Mac Client Version 1.0.1
A defect that would cause the client to fail to boot from 2030 onward was fixed.
28 DEC 2025 Version 1.0.1
Version indication text was added to the title screen.
Other small corrections were made. -